Tillable
Pricing
SupportSign in

POS and Payments

  • Payments overview
  • Point of Sale
  • Handheld POS
  • Tap to Pay

Digital Payments

  • Payment Links
  • QR Order and Pay
  • Click and Collect
  • Online Shop

Customers

  • Bookings
  • Customer CRM
  • Gift Cards
  • Loyalty

Operations

  • Floor Plans
  • KDS (Kitchen Display Screens)
  • Menu Management
  • Reporting
  • Inventory

Team

  • Access Permissions
  • Staff Rota

Money

  • Tillable Capital

Integrations

  • Accounting
  • Tipping

Marketplace

  • Build on Tillable
  • Built by Tillable

Payment Terminals

Take payments anywhere, contactless or chip and PIN.

Register

Counter-ready systems with payments built in.

Accessories

Stands, printers, cash drawers and cables for your counter.

Learn

Get more out of Tillable.

  • Blog
  • Guides

Help

Support when you need it.

  • Support
  • Developers
Menu Management
OverviewFeaturesPricing
Contact salesGet started
OverviewFeaturesPricing

A menu for every service.

Build breakfast, lunch and evening menus from the same products. Arrange each one, set its prices and give your team the choices they need.

Build your first menu Explore menu management
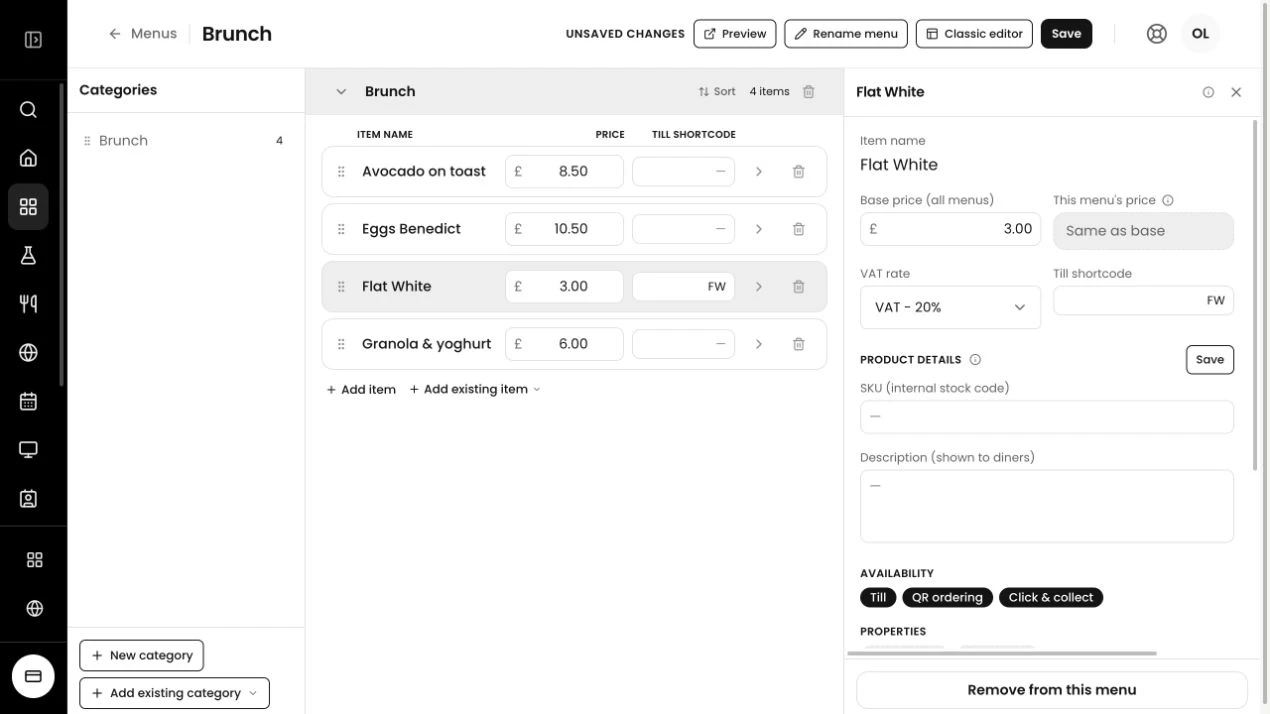
Tillable’s menu builder, with a brunch category, editable product rows and Flat White details open alongside them
The Tillable menu editor. Sample items and prices.View full screen (opens in a new tab)

Put things in order

Group products into categories and drag each item where your team expects to find it.

Edit with the menu in view

Open a product beside the menu to change its name, base price, VAT or till label.

Check it before service

Save your work and open the preview. Your tills receive the changes on their next menu refresh.

One flat white.
More than one menu.

A product can appear on your brunch, lunch and evening menus. Its name, photo and description come from the same catalogue record.

A price for each menu

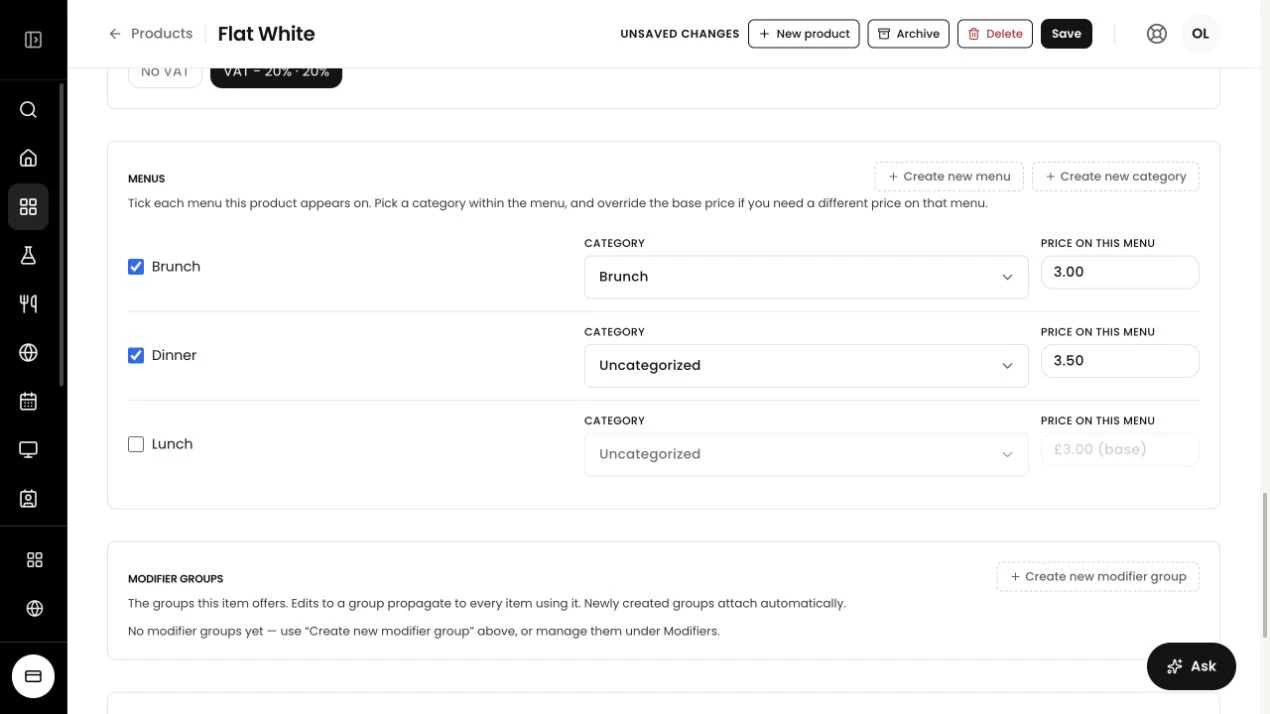
Charge a different price at a different service. Set an override for that menu and leave the product’s base price alone.

Copy an existing menu when you need a starting point. The copy shares its products, so you can rearrange them without building the catalogue again.

Flat White product settings with separate prices for the Brunch and Dinner menus
The same product, with sample menu prices.View full screen (opens in a new tab)
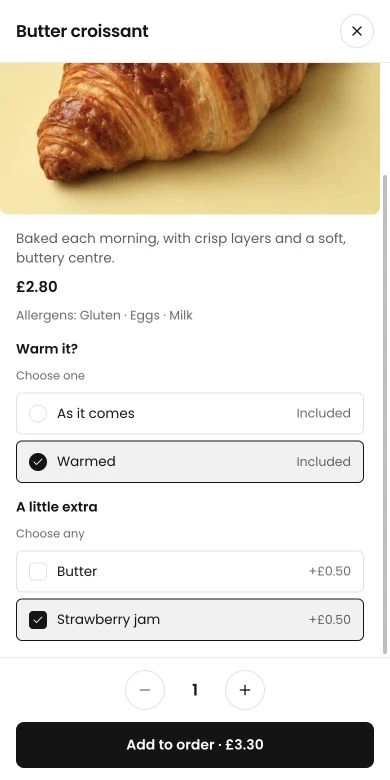
Tillable’s customer ordering screen showing a croissant, a warming choice, and optional butter or strawberry jam
How choices appear to a customer. Sample menu.View full screen (opens in a new tab)

Warmed through.
With a little extra.

Let customers order it their way. Set up a group of choices once, then attach it to the products that need it.

  • One choice or a few

    Ask for a single choice, such as warmed or as it comes. Allow several selections when customers can add more than one extra.

  • Set the defaults and prices

    Choose what comes as standard and add a price for extras. Reuse the group across products. On the till, limit it to the menus that need it.

  • Keep the request with the order

    The selected options appear with the item on kitchen tickets and screens, so the team can see what to prepare.

Choose what goes on sale.
And where.

Your counter and your online menus do not have to offer the same selection. Keep the products together and control where they appear.

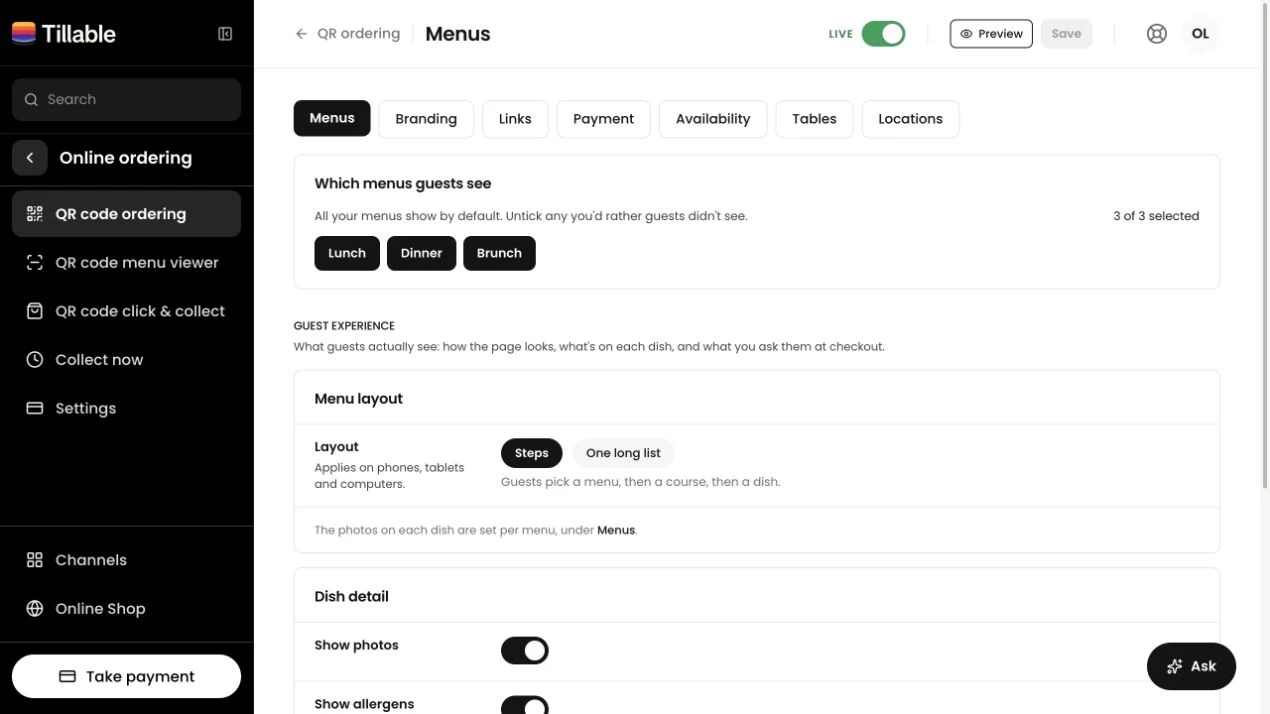
Tillable QR ordering settings showing the selection of menus customers see and the menu layout controls
Choose the menus customers see when ordering by QR.View full screen (opens in a new tab)
  • At each location

    Hide a menu from the locations that do not use it. Keep a venue’s selection relevant to what that team serves.

  • On each sales channel

    Choose whether a product appears on the till, QR ordering, Click & Collect or your online shop.

  • For the customer ordering online

    Add a photo and description to help someone choose. The product can use a short label on the till and fuller details online.

Ask for the change.
Have the final say.

Use the menu assistant when you have a list of changes to make. Describe the work, then check its proposals before anything is applied.

You can adjust a proposed price or reject an individual change. Approval stays with you.

Ask about the menu assistant

“Add a brunch menu using our existing coffees and pastries.”

A request you could give the assistant.

  1. Describe what you want. Name the menu and the products to include.
  2. Review the proposal. Read the suggested changes and check the products and prices.
  3. Approve what is right. Apply the changes you have checked, then preview the saved menu.

Your first menu needn’t
start from an empty page.

Bring your existing products over with a spreadsheet. Check the import before saving, then arrange the menu for your team.

  1. Fill in the template

    Add your products, categories and option groups to the CSV template. Existing products are matched by name rather than overwritten.

  2. Check the preview

    Review what will be created before importing. If you need to start again, you can undo the whole import from its history.

  3. Make it your menu

    Arrange the products, check their prices and preview the result. Refresh the till when you are ready to use the saved menu.

See all menu management features

From the menu to the order.

Use your products at the till and in QR ordering. Send the ordered items and their choices to the kitchen stations that prepare them.

Point of SaleRun the same point of sale on your handheld and countertop till. Take orders and payments on the shop floor, at the table or over the counter, with every sale recorded once.KDS (Kitchen Display Screens)Route each dish to the station preparing it, with the choices and notes kept with the order. Read the ticket, make it and mark it ready.QR Order and PayGuests open your menu, choose their order and send it to their table’s tab. Your team picks it up on Tillable.

Questions and answers.

Can one product have different prices on different menus?

Yes. Set a price for each menu, or leave it blank to use the product’s base price. Menu prices remain separate when you edit the product or rearrange a menu. Its section and position can differ too.

When do saved changes reach the till?

On the next menu refresh. Staff can refresh from the menu screen; opening the app or pairing the device again also refreshes it. If a refresh fails, the device keeps its last working menu.

What does duplicating a menu keep?

The copy keeps the sections, product placements, menu prices and location restrictions. It shares the existing products, including their details and option groups. The menu photo is not copied, so add that separately.

Are location settings and channel switches the same thing?

No. Menu settings choose the sites that receive a menu. Product switches choose whether an item appears on the till, QR ordering, click and collect, or shop. Online ordering settings also choose which menus customers see.

Can I check an import and undo it afterwards?

Yes. Preview the menus, products and choices before confirming a spreadsheet import. Existing products are skipped rather than overwritten. Import history lets you undo the products, sections and option groups that import created.

Does the menu assistant make changes by itself?

No. Describe the change, then review its proposal. Check the products and prices, untick changes you do not want and approve when it is right. Approved changes are recorded in History and reach tills on their next menu refresh.

Tillable

Bring your menu along.

Show us what you sell and how your menus change through the day. We’ll walk through the products, prices and choices with you.

Get startedContact sales
Tillable

Beyond Possible

Subscribe to our newsletter

Product

  • Point of sale
  • Payments
  • Inventory
  • Reporting

Solutions

  • Coffee
  • Restaurants
  • Retail
  • Bars
  • Multi-location

Company

  • About
  • Customers
  • Careers
  • Press
  • Contact

Resources

  • Docs
  • API
  • Support
  • Roadmap
  • Changelog

© 2026 Table Yeti Ltd. All rights reserved.
Tillable is a registered trademark of Table Yeti Ltd (company no. 11634791).

PrivacyTermsCookies